Connecting
Connecting for the first time
All connections to the NOAA RDHPCS enclave are done via Secure Shell (SSH) in a terminal session to a Bastion, or via a web browser to ParallelWorks. See our ParallelWorks guide.
Note
For access to the MSU HPC systems Orion and Hercules, please review the MSU-HPC user guide.
Authentication is via a CAC/PIV card or YubiKey Multi-Factor Authentication.
Internal to the enclave, X509 certificates are used to authenticate between resources. At first login, and at yearly intervals, a master certificate valid for one year is created (SSH Bastion login required) with a user-defined pass-phrase. At each successive log in, a thirty-day proxy certificate is created and used for resource access and data transfers.
Attention
You must have access to an RDHPCS resource (system) in order to log into it! Visit the Account Information Management website to view your RDHPCS profile and system access.
Access to most RDHPCS systems require a signed x.509 certificate. The first login attempt will generate a master certificate request. You will experience a short (less than 5 minute) delay while the request is signed. Users cannot fully log on to a system until that certificate is signed.
The prompt will ask you to create a passphrase. Create a passphrase with a minimum of three words.
Note
Do not worry if you forget your passphrase – just continue to try. On the 4th attempt the system will prompt you to recreate your master certificate.
Secure Shell (SSH) Access
Access to on premise RDHPCS compute resources is done using the Secure Shell (SSH) protocol to one of the system’s bastions, or via ParallelWorks.
MSU systems (Orion, Hercules) are accessed via SSH or OpenOnDemand. See MSU-HPC Logging In for instructions.
SSH terminal clients are part of the standard Operating Systems (O/S) in use today across Linux, MacOS, and Windows. Windows 10 and Windows 11 git have added built-in support for SSH. If it is not installed on your version of Windows, please refer to Microsoft’s documentation on OpenSSH.
Graphical SSH clients for Windows systems are available; users have reported success with applications such as PuTTY-CAC, SecureCRT, or MobaXterm.
Bastion Hostnames
As of mid 2026, there is only one type of Bastion used for both CAC or Yubikey access.
RDHPCS System |
MFA Bastion hostnames |
Gaea |
gaea-mfa.princeton.rdhpcs.noaa.gov gaea-mfa.fairmont.rdhpcs.noaa.gov |
Hera |
hera-mfa.princeton.rdhpcs.noaa.gov hera-mfa.fairmont.rdhpcs.noaa.gov |
PPAN |
analysis-mfa.princeton.rdhpcs.noaa.gov analysis-mfa.fairmont.rdhpcs.noaa.gov |
Mercury |
mercury-mfa.princeton.rdhpcs.noaa.gov mercury-mfa.fairmont.rdhpcs.noaa.gov |
Ursa |
ursa-mfa.princeton.rdhpcs.noaa.gov ursa-mfa.fairmont.rdhpcs.noaa.gov |
In addition to the NOAA systems, RDHPCS users have access to computational capacity on the Orion and Hercules systems, hosted by Mississippi State University. See the MSU-HPC user guide. for detailed information.
Computational capacity is also available on the RDHPCS Cloud Platform, which allows NOAA users to create custom HPC clusters on an as-needed basis, through the Parallel Works platform. The Cloud User Guide provides more information.
Common Access Card (CAC) SSH Login
RDHPCS users with a CAC who are logging in from a Windows, Mac, or Linux system are recommended to use a CAC login. This requires a CAC reader and a modern OpenSSH client, or PUTTY-CAC for Windows.
Attention
If you recently were issued a new or renewed CAC, please log into the Account Information Management website to update the CAC information.
Reference the table above for the appropriate Bastion to use.
When prompted, enter your CAC PIN.
See also the ssh port tunnels section to create an OpenSSH configuration for easy RDHPCS access.
Always start by inserting your CAC/PIV card before using
ssh. If the CAC/PIV is not available, authentication will fall
through to Yubikey, and the password prompt will be different.
Linux
ssh -oPKCS11Provider=/usr/lib64/pkcs11/opensc-pkcs11.so First.Last@BASTION
Mac OS
ssh -oPKCS11Provider=/usr/lib/ssh-keychain.dylib First.Last@BASTION
Windows
Open PuTTY-CAC. Select the desired profile (Bastion / HPCS) and click Connect or something like that.
Open PuTTY-CAC and load or create a saved session profile.
Navigate to Connection → SSH → Certificate and confirm your PIV authentication certificate is shown under Selected thumbprint. If not, repeat the Set CAPI Cert… step from Step 2.
Return to Session, select your profile, and click Save.
Click Open to initiate the connection.
Verify the server key fingerprint when prompted and click Yes.
Enter your RDHPCS username (
First.Lastformat).When the certificate confirmation dialog appears, click OK and enter your CAC/PIV PIN.
Note
Your card reader may flash during login. Do not remove your card until you are fully logged in.
Yubikey SSH Login
RDHPCS users who do not have a CAC, or lack the required hardware or software, are welcome to use their NOAA issued Yubikey to login. You must have configured and registered your Yubikey for NOAA RDHPCS access.
$ ssh First.Last@BASTION
All bastions are available for both CAC and Yubikey logins.
When prompted, enter your Yubikey PIN then press and hold your Yubikey (long press).
Selecting a Node
RDHPCS systems accessed via SSH allow users to select a specific head node at login. After successful authentication at the bastion host, a list of available nodes will be displayed with a 5 second delay to choose a specific destination. To select a specific host, press Control+C (^C) and enter the desired node.
Here is an example of what the display looks like for the Gaea system mid 2024:
Welcome to the NOAA RDHPCS.

Attempting to renew your proxy certificate...Proxy certificate has 720:00:00  (30.0 days) left.

        Welcome to gaea.rdhpcs.noaa.gov
Gateway to gaea-c5.ncrc.gov and other points beyond

!!!!!!!!!!!!!!!!!!!!!!!!!!!!!!!!!!!!!!!!!!!!!!!!!!!!!!!!!!!!!!!!!!!!!!!!!!!!!!!
!! RDHPCS Policy states that all user login sessions shall be terminated     !!
!! after a maximum duration of seven (7) days. ALL user login sessions will  !!
!! be dropped from the Princeton Bastions at 4AM ET / 2AM MT each Monday     !!
!! morning, regardless of the duration. Please note: This will NOT impact    !!
!! batch jobs, cron scripts, screen sessions, remote desktop, or data        !!
!! transfers.                                                                !!
!!!!!!!!!!!!!!!!!!!!!!!!!!!!!!!!!!!!!!!!!!!!!!!!!!!!!!!!!!!!!!!!!!!!!!!!!!!!!!!

Hostname            Description
gaea                C5 head nodes
gaea51              C5 head node
gaea52              C5 head node
gaea53              C5 head node
gaea54              C5 head node
gaea55              C5 head node
gaea56              C5 head node
gaea57              C5 head node
gaea58              C5 head node
gaea60              T6 Test access only
gaea61              C6 head node
gaea62              C6 head node
gaea63              C6 head node
gaea64              C6 head node
gaea65              C6 head node
gaea66              C6 head node
gaea67              C6 head node
gaea68              C6 head node

You will now be connected to NOAA RDHPCS: Gaea (CMRS/NCRC) C5 system.
To select a specific host, hit ^C within 5 seconds.
Note
After the 5 second wait, the bastion node will use a load balancer to select a lightly loaded node.
Tectia
RDHPCS users with a CAC who are logging in from a Windows, Mac, or Linux workstation/laptop are required to use CAC login. Access to RDHPCS resources via CAC requires a CAC reader and necessary software. The Tectia SSH Client software has been selected to meet the remote CAC login requirements for the RDHPCS program. Two licenses have been purchased for each RDHPCS user.
The following features are supported:
X11 tunneling
Port forwarding (see SSH Port Tunnels)
Access to RDHPCS Systems from a system which cannot directly access a user’s CAC is not supported.
Tectia Initial Setup procedure
SSH Tectia Client provides secure terminal client functionality for remote users and system administrators for accessing remote hosts running SSH Tectia Server or other Secure Shell server.
Locate the CAC-bastion hostname you need:
CAC users must connect to a CAC bastion hostname. YubiKey users must connect to an RSA bastion hostname.
RDHPCS system |
CAC bastion hostnames |
RSA bastion hostnames |
Gaea |
gaea.princeton.rdhpcs.noaa.gov gaea.boulder.rdhpcs.noaa.gov |
gaea-rsa.princeton.rdhpcs.noaa.gov gaea-rsa.boulder.rdhpcs.noaa.gov |
Hera |
hera.princeton.rdhpcs.noaa.gov hera.boulder.rdhpcs.noaa.gov |
hera-rsa.princeton.rdhpcs.noaa.gov hera-rsa.boulder.rdhpcs.noaa.gov |
Jet |
bastion-jet.princeton.rdhpcs.noaa.gov bastion-jet.boulder.rdhpcs.noaa.gov |
jet-rsa.princeton.rdhpcs.noaa.gov jet-rsa.boulder.rdhpcs.noaa.gov |
PPAN |
bastion-analysis.princeton.rdhpcs.noaa.gov bastion-analysis.boulder.rdhpcs.noaa.gov |
analysis-rsa.princeton.rdhpcs.noaa.gov analysis-rsa.boulder.rdhpcs.noaa.gov |
Mercury |
mercury-cac.princeton.rdhpcs.noaa.gov mercury-cac.boulder.rdhpcs.noaa.gov |
mercury-rsa.princeton.rdhpcs.noaa.gov mercury-rsa.boulder.rdhpcs.noaa.gov |
Ursa |
ursa-cac.princeton.rdhpcs.noaa.gov ursa-cac.boulder.rdhpcs.noaa.gov |
ursa-rsa.princeton.rdhpcs.noaa.gov ursa-rsa.boulder.rdhpcs.noaa.gov |
The OS-specific tabs (Windows, Linux, MAC) in the Install the Tectia Client section describe how to do the following:
Download the Tectia software
Install the Tectia software on your local laptop or workstation
Install the license file on your local laptop or workstation
Configure the Tectia software
Use the client software to connect to R&D HPC Systems
Locate the CAC-bastion hostname you need in the Bastion Hostnames table. Then follow the instructions for your operating system.
Note
Users will likely need to contact their local IT Help Desk to download and install Tectia.
Requirements
You must have current CAC information in AIM for the Tectia CAC logon to work. To confirm that your CAC information is correct authenticate using your CAC in AIM. If your CAC information has been refreshed, wait 15 minutes before attempting to log in using Tectia.
In order to install the Tectia SSH Client, you must have the necessary administrator privileges on your system. If you do not have this access, contact your IT system administrator for assistance.
The Tectia Client installation requires about 140 megabytes of disk space and your system must have a CAC reader.
Install the Tectia Client
The Windows installation package is provided in the MSI (Microsoft Installer) format. The same package is compatible with the supported 32-bit (x86) and the 64-bit (x64) versions of Microsoft Windows. Time to complete is approximately 10 minutes.
Download the Tectia client.
Follow the Tectia client link to open new tab on your browser. You may have to authenticate using your NOAA email and password.
Once you have authenticated and the folder is shown in your browser, select
tectia-client-<version>*-windows*.zipSelect one of the .msi packages for 32-bit (x86) or 64-bit (x86-64) machines.
Extract the installation zip file contents to a temporary location. The download package includes Tectia documentation .pdf files that can be used after the basic install described here to learn more, customize, etc. Please review this documentation before requesting help beyond the scope of this basic setup procedure.
Please note that the zip file also includes the license file named
stc??.dat, which will need to copied to the appropriate place as mentioned in a later step.Locate the Windows Installer file:
ssh-tectia-client-<version>-windows.msifor 32-bit Windows systems.ssh-tectia-client-<version>-windows_64.msifor 64-bit Windows systems.
Where
<version>corresponds to the version and build number, for example6.4.10.123. On some Windows versions, the.msifile extension is not shown for the installer file.Double-click the installation file, and the installation wizard will start.
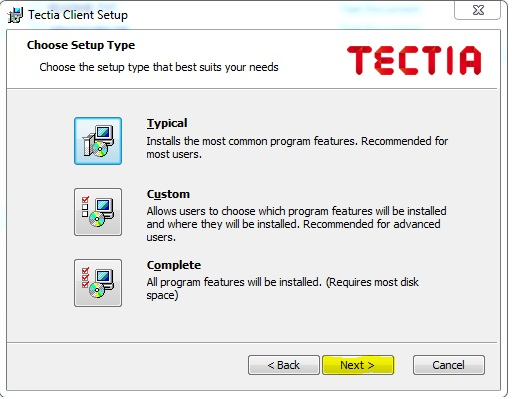
Select Typical and click Next.
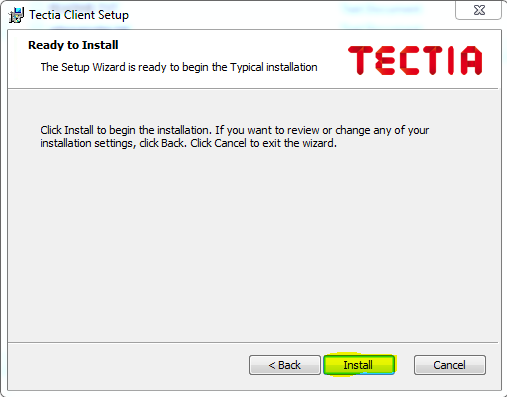
Click Install.
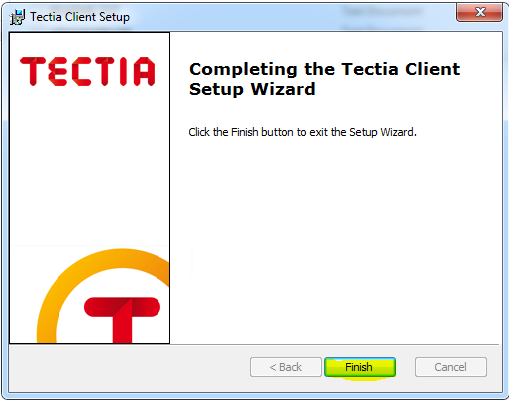
When the client is fully installed, click Finish.
You will now see two icons on your desktop. One is named “Tectia – SSH Terminal” and the second one is named “Tectia – Secure File Transfer.
Reboot your computer.
Find and install the Tectia license that is available in the tar file as mentioned in step 2 above. Copy the license file
stc??.datto the appropriate location as described below:Copy the license file
stc??.datto the appropriate location as described below:64-bit Windows versions:
C:\Program Files (x86)\SSH Communications Security\SSH Tectia\SSH Tectia AUX\licenses
32-bit Windows versions
C:\Program Files\SSH Communications Security\SSH Tectia\SSH Tectia AUX\licenses
Note
Tectia SSH will install on RHEL-based Linux systems, e.g., RHEL, Centos, Fedora, Rocky Linux
Note
The Tectia client uses Coolkey to access the certificates on your CAC. Coolkey should be available in your distribution.
$ sudo yum install coolkey
Once Coolkey is installed you will need to know the full path
to the library, for example /usr/lib/pkcs11/libcoolkeypk11.so
Download the Tectia client.
Follow the Tectia client link to open new tab on your browser. You may have to authenticate using your NOAA email and password.
Once you have authenticated and the file is shown in your browser, click on the appropriate file.
Expand the archive.
$ tar xf tectia-client-*-linux-x86_64*.tar
Note
The download package includes Tectia documentation .pdf files that you can use after the basic install described here to learn more, customize, etc. Please review this documentation before requesting help beyond the scope of this basic setup procedure.
Note
Please note that tar file also include the license file named
stc??.dat, which should be copied to the appropriate place as mentioned in a later step.Change into the client directory.
$ cd tectia-client-6.4.13.36-linux-x86_64-upgrd-eval/
Run the installer
$ rpm -i *.rpm
Modify Path
The Tectia client is installed in
/opt/tectia/. It is advisable to add the binary directory to your path.If your default shell is bash, you can add the following to your
~/.profilefile.if [ -d "/opt/tectia/bin" ] ; then export PATH="$PATH:/opt/tectia/bin" fi if [ -d "/opt/tectia/man" ] ; then export MANPATH="$MANPATH:/opt/tectia/man" fi
If your default shell is csh, you need to edit your
~/.cshrcfile.if ( -d "/opt/tectia/bin" ) ; then setenv PATH "$PATH:/opt/tectia/bin" endif if ( -d "/opt/tectia/man" ) ; then setenv MANPATH "$MANPATH:/opt/tectia/man" endif
Find and install the Tectia license, available in tar file described in step 2. Copy the license file
stc??.datto the appropriate location as follows:$ mkdir /etc/ssh2/licenses/ $ cp stc64.dat /etc/ssh2/licenses/
The Mac installation package includes installers for both the Tectia software and the license.
Follow the Tectia client link to open new tab on your browser. You may have to authenticate using your NOAA email and password. Once you have authenticated and the file is shown in your browser, click “Download.”
Locate the packages under your Downloads folder
SshTectiaClient-<version>.pkg, where<version>corresponds to the version and build number, for example 6.5.0.1087).Double-click the box icon to the right of the package name to start the installation wizard.
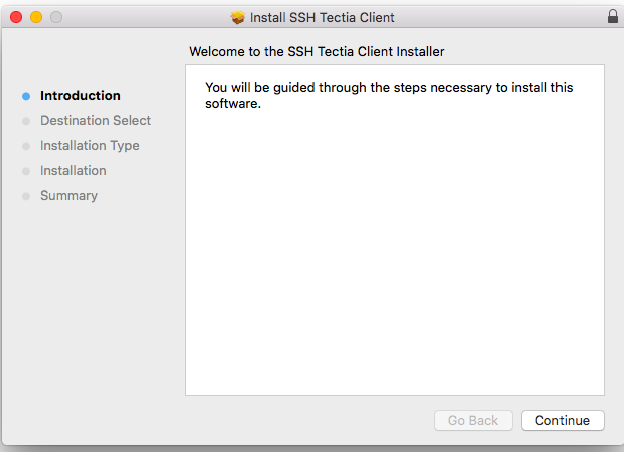
Click continue. The Wizard lets you specify the destination and installation type. Click “Continue” to accept the destination and standard installation, then click “Install”.
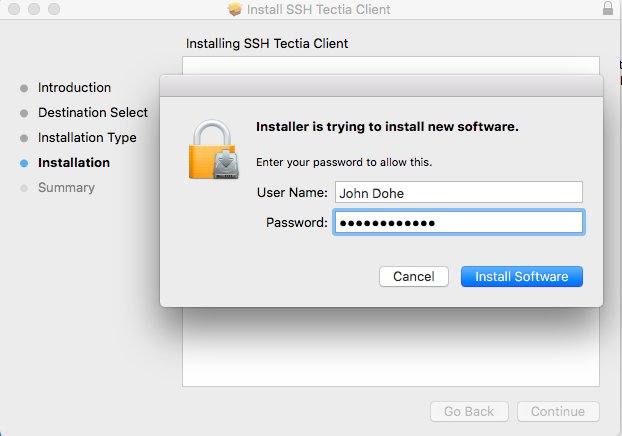
Enter the password for your desktop/laptop login and click “Install Software”. You’ll see a confirmation message when the installation is complete.
Reboot your computer.
The Tectia software you just installed requires a new license and once installed, works for all RDHPCS logons. To request a license, please email ONE help request to the help desk of the system you use the most. Please use the subject “Tectia Mac license request”.
Download the license file.
Locate the packages under your Downloads folder
ssh-tectia-client-license-<version>.pkg, where<version>corresponds to the version and build number, for example 6.5.0.1087).Double-click the box icon to the right of the package name and the installation wizard will start.
Repeat the installation steps above until you get “The installation was successful” message.
Configure the Tectia Client
Double-click the “Tectia – SSH Terminal” icon on your desktop. The following screen appears:
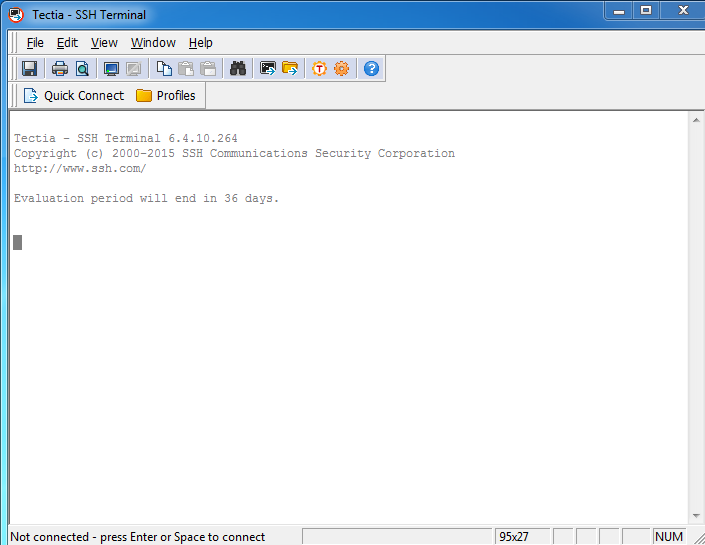
In the menu bar, select “Edit” > “Tectia Connections”.
Set your default username
In the sidebar menu select “General” > “Default Connection”
In the default “Connection” tab select “Specify user name”, and enter your user name, which must match your NOAA Email user name in AIM. The user name is case sensitive, and should be in the form of “Firstname.Lastname” or “Firstname.M.Lastname” (ex: John.Smith, John.P.Smith). Do not include the @noaa.gov.
Select “Apply”
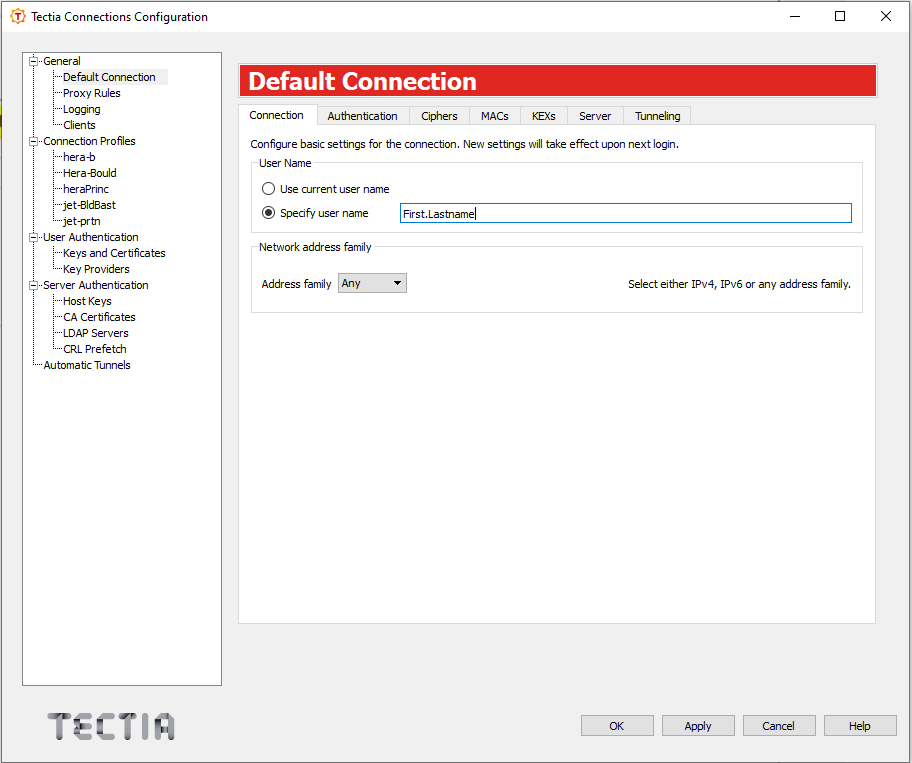
Optional: Set X windows forwarding
Select the “Tunneling” tab.
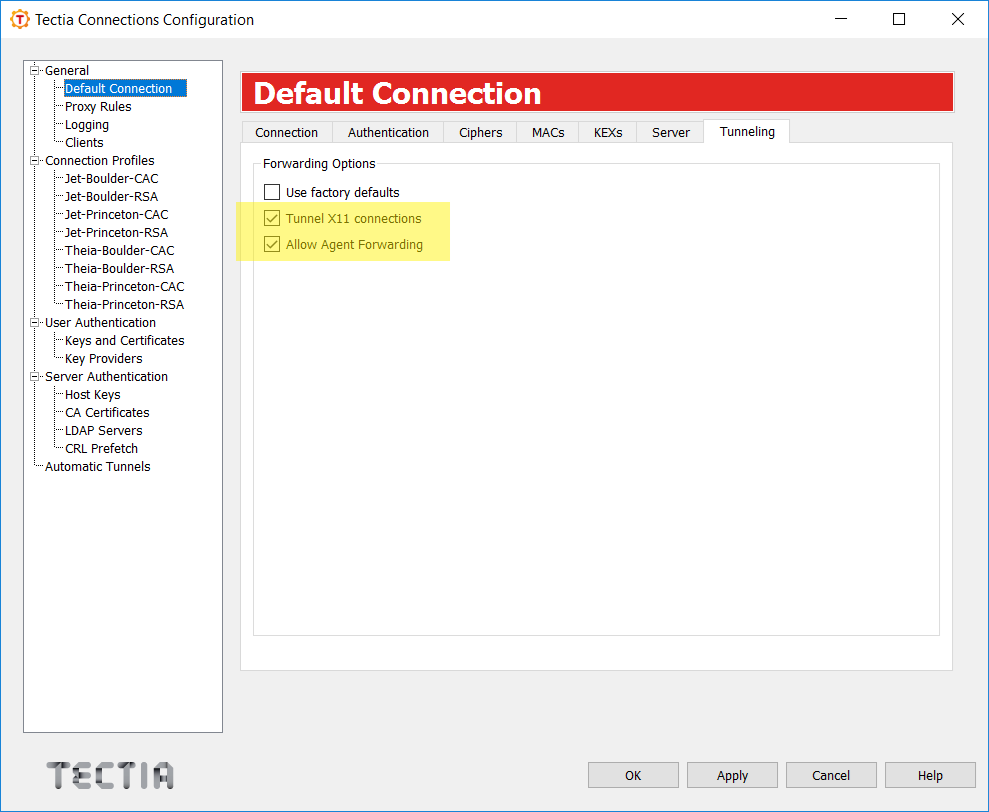
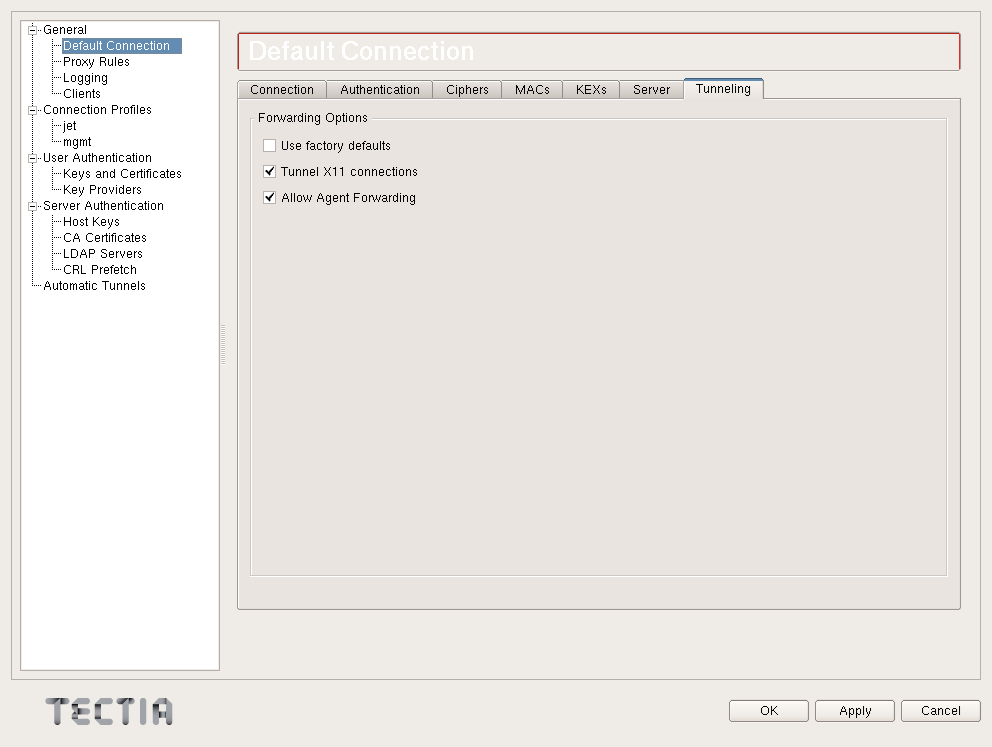
Check the two boxes as illustrated, and click “Apply”.
In the sidebar menu:
Select “User Authentication” > “Key Providers” .
Select the “Enable Microsoft Crypto API” check box. This is needed to view your CAC card certificates.
Select “Apply”
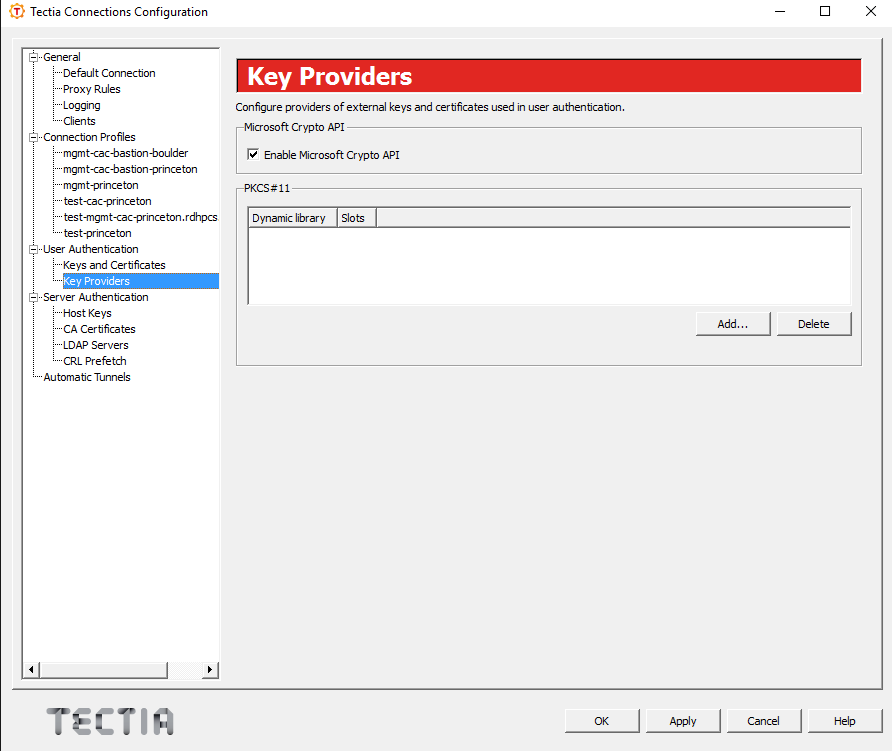
Set up a connection profile for each hostname that you want to use. There are two bastions, one in Boulder, CO and one in Princeton, NJ. It is highly recommended that you set up a profile from each bastion for each RDHPCS system you need to use, as bastions are typically down during maintenance periods.
In the sidebar menu select “Connection Profiles”.
Select “Add Profile”.
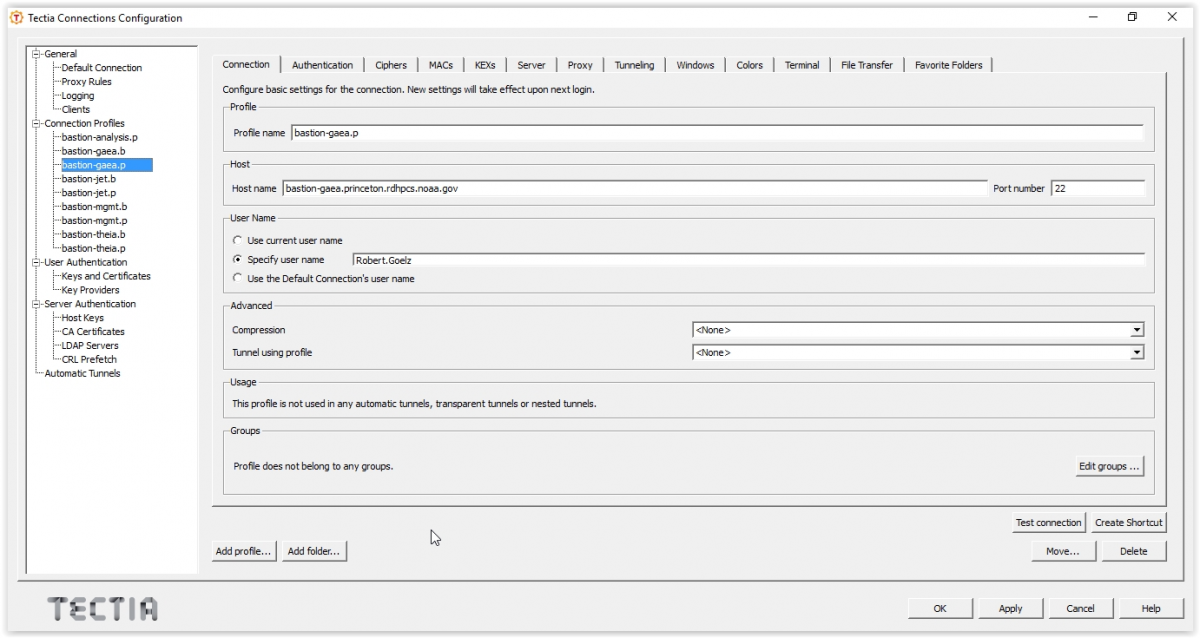
In the “Connection” tab: Fill out the information for the hostname you are configuring. * Enter the “Profile Name” you want to assign to the hostname (ex: Jet-BLDR bastion). Leave “Port number” =22.
Enter the Host Name from the bastion list.
Select “Apply”.
To add another profile select “Add Profile” in the lower left, and repeat the above steps.
Select “OK” when all profiles are set.
The example below shows a profile for the CAC Gaea bastion in Princeton. The port used (22) is correct, as is the User Name selection. This can be set here, or just select the radio button next to “Use the Default Connection’s username”.
Tectia stores its configuration in
${HOME}/.ssh2/ssh-broker-config.xml. It is recommended to
use the graphical configuration tool, ssh-tectia-configuration.
Launch the configuration client (ssh-tectia-configuration).
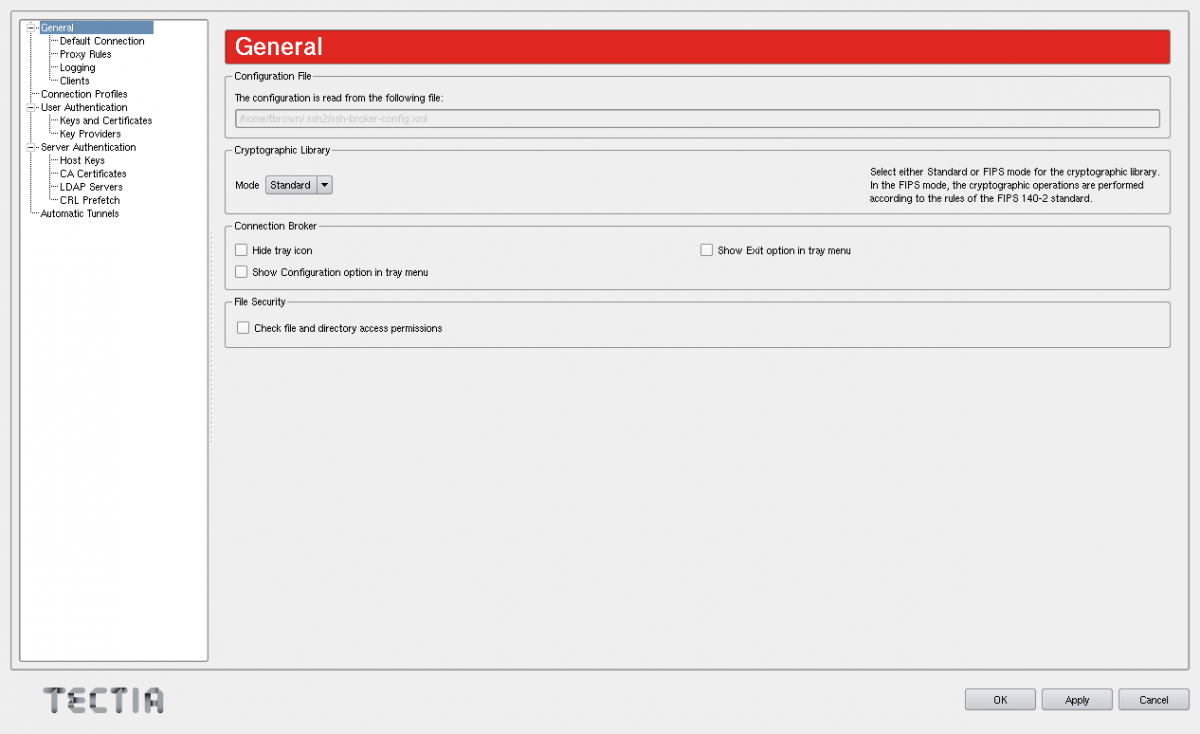
In the Default Connection item, set a default user name.
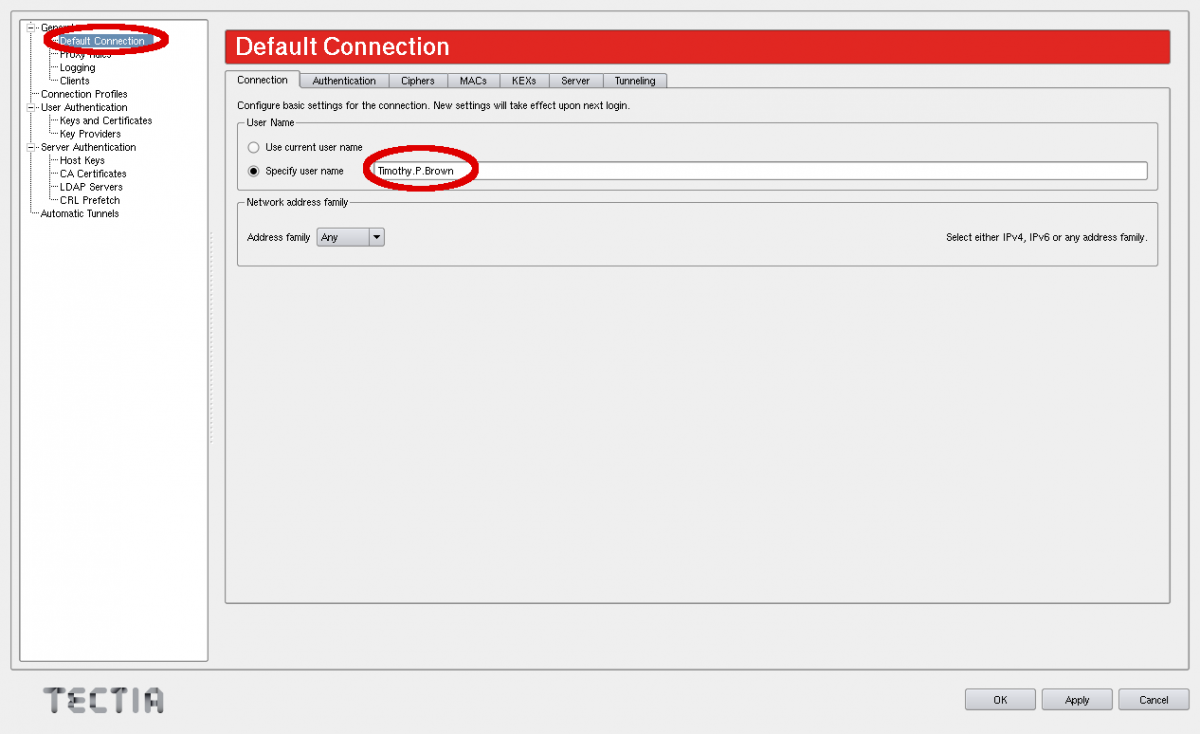
Enable X11 Forwarding
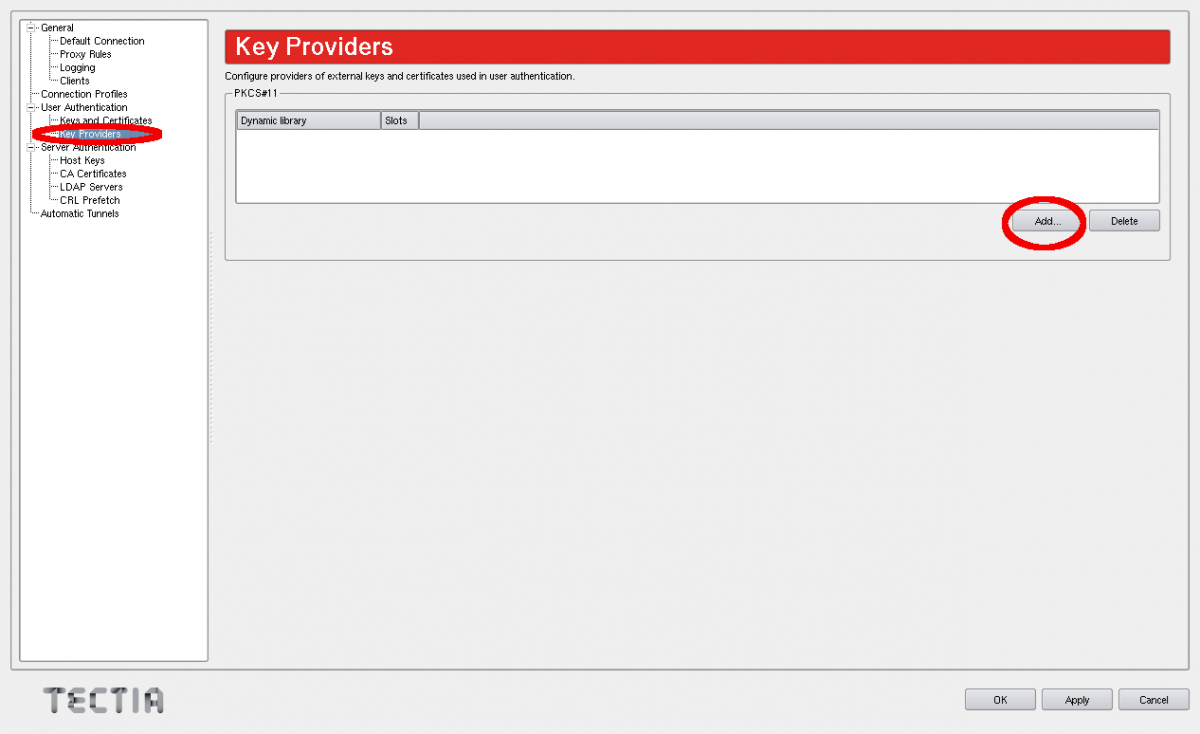
Add a PKCS 11 library under the “Key Providers” item and click on the “Add” button.
Add the full path to the Coolkey library. It should be
/usr/lib64/pkcs11/libcoolkeypk11.so.
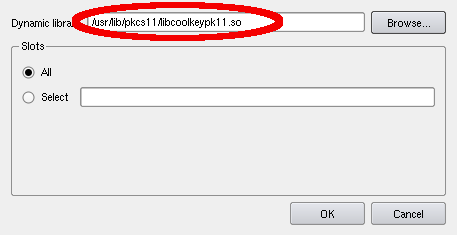
Check to make sure this is the correct location.
Confirm that the PKCS 11 key providers contains the Coolkey library.
Under “Connection Profiles, add a new connection profile.
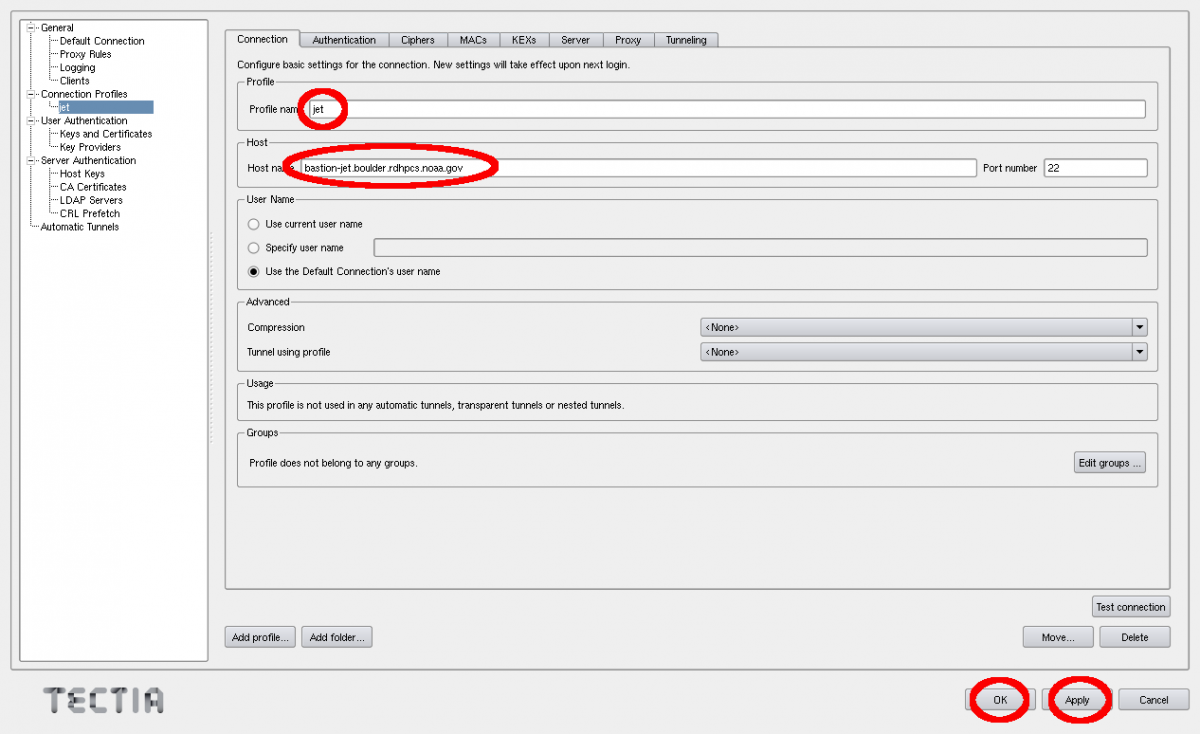
Set a profile name, for example “jet”.
Set the full hostname, for example bastion-jet.boulder.rdhpcs.noaa.gov.
Apply the changes and then click OK.
Using the Tectia SSH Client
Once Tectia has been configured and the binary directory has been added to your path. You can ssh into to Jet using your CAC. The Tectia ssh command is
sshg3.
In a terminal window type
sshg3 jetwhere jet is the name of the connection profile created under step 5 of the configuration.You will be prompted to save and accept a key for this bastion. Then type “save”.
Once the key is accepted you will be prompted for your CAC Pin (“Passphrase for the private key:”); Please note that the prompt is very misleading! It is not asking for your “pass phrase for the certificate” (which the 3 word that you use to renew your certificate)!
If successful you will see the message “Authentication successful.” and you will be forwarded to a front-end host.
Tectia stores its configuration in
${HOME}/.ssh2/ssh-broker-config.xml. It is recommended to
use the graphical configuration tool,
ssh-tectia-configuration.
Launch the configuration client (
ssh-tectia-configuration) or from the Applications directory (/Applications/SshTectiaClient)
Set a default username under the “Default Connection” item. This should be your case sensitive NOAA RDHPCS login username.
Enable X11 Forwarding
If no Key Provider is specified (if the Dynamic Library list is blank), add a PKCS 11 library under the “Key Providers” item.
Click the “Add” button.
Select “Browse.” This should pull up the full path to the opensc-pkcs11 library.
The full path is
/Applications/SshTectiaClient.app/Contents/PlugIns/OpenSC/opensc-pkcs11.so.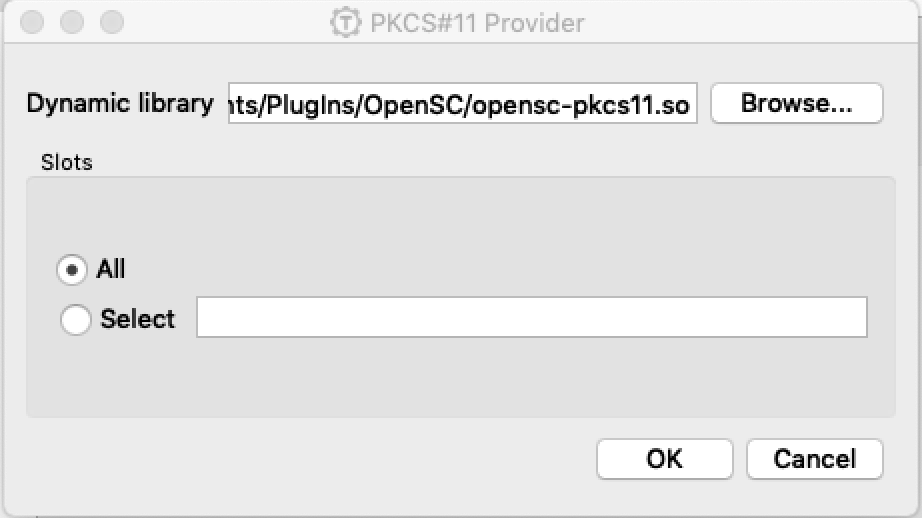
Please check to make sure this is the correct location.
Under “Connection Profiles, add a new connection profile.
Set a profile name, for example “jet”.
Set the full hostname, for example “bastion-jet.boulder.rdhpcs.noaa.gov”.
Apply the changes and then click OK.
Once the Tectia Client has been configured, you can connect to any of the following CAC bastions.
Using the Tectia SSH Client
Once Tectia has been configured and the binary directory has been added to your path, you can ssh into to any RDHPCS system using your CAC with the
sshg3command.
With the CAC card inserted in the reader, in a terminal window type “sshg3 jet” where “jet” is the name of the connection profile created under step 5 of the configuration.
You will be prompted to save and accept the key for this bastion. You need to type “save”.
Once the key is accepted you will be prompted for your CAC Pin.
Note
The prompt for the CAC reads: “Passphrase for the private key:”; and the prompt is very misleading! It is not asking for your “passphrase for the certificate” (the 3 words that you use to renew your certificate)!’’’
If successful you will see the message “Authentication successful.” You will be forwarded to a front-end host.
Port tunnels
See SSH Port Tunnels for your LocalForward port number and the port assignment formula.
Open your connection profile and select the Tunneling tab.
Check Use Defaults.
Click Add and fill in the tunnel settings:
Type: TCP
Listen port: your LocalForward port for this system
Allow local connections only: checked
Destination host:
localhostDestination port: same as the Listen port
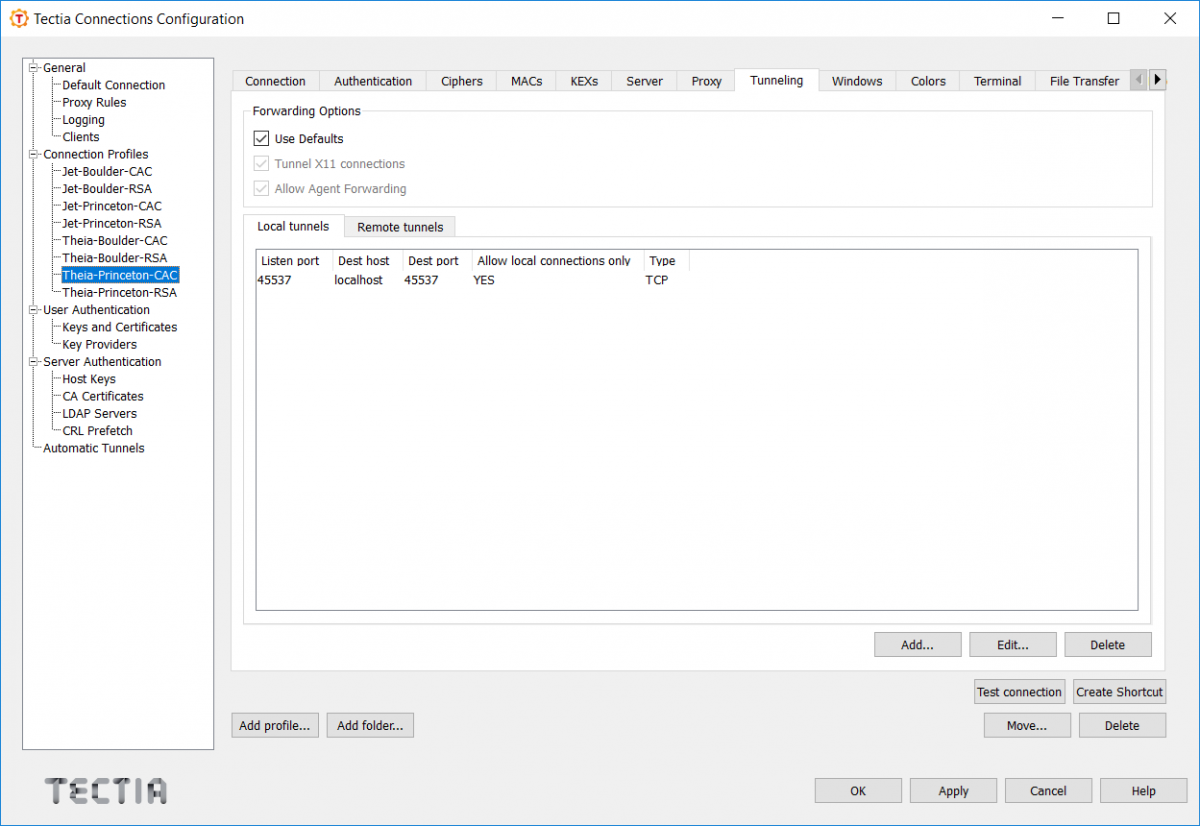
Click OK, then click Apply to save the profile.
Repeat these steps for each connection profile you use.
Open your connection profile and select the Tunneling tab.

Check Use Defaults. Confirm that Tunnel X11 connections and Allow Agent Forwarding are checked.

Click Add and fill in the tunnel settings:
Type: TCP
Listen port: your LocalForward port for this system
Allow local connections only: checked
Destination host:
127.0.0.1Destination port: same as the Listen port
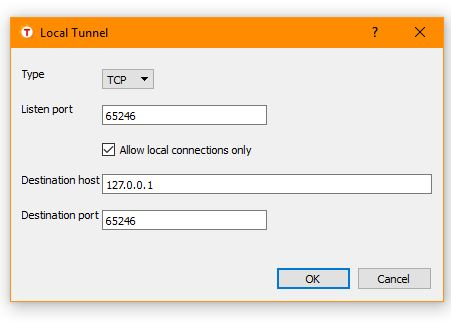
Click OK.
Click Test connection to verify the tunnel is active.
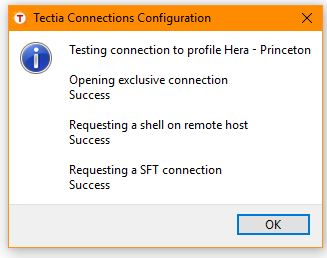
The completed configuration looks like the following:
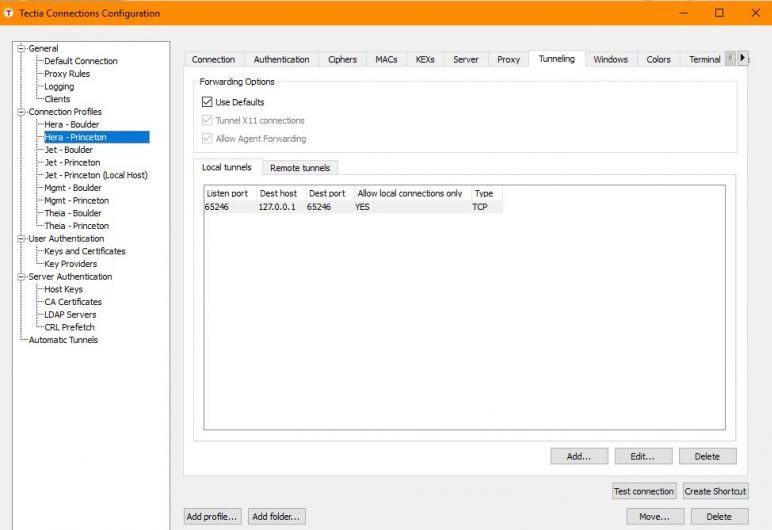
Click Apply to save the profile.
Repeat these steps for each connection profile you use.
X11 forwarding
X11 forwarding is enabled by default when Use Defaults is checked in the Tunneling tab of your connection profile (covered in the Configure section above).
To connect with explicit X11 forwarding from the command line, add
the -X flag to sshg3:
$ sshg3 -X CAC-BASTION-HOSTNAME
Reference
Tectia SSH Client documentation — official product documentation
AIM — manage CAC information and account details
X11 Graphics
Users can use SSH X11 forwarding to open GUI-based applications (e.g.,
xterm, ARM Forge). This is typically done using an SSH option. For
OpenSSH-based clients, use the -X option:
$ ssh -X host.url
Other clients, like PuTTY-CAC, will have an option when configuring the host.
The base SSH X11 forwarding is typically slow. A different option is to use ParallelWorks with a graphical desktop accessible via web browser.
Note
Microsoft Windows users can use any of the X11 servers available for Windows. The SSH client will need to be configured to use the X11 server for forwarding X11.
SSH Port Tunnels
To allow users to easily transfer small files to and from the RDHPCS systems, the bastion configures SSH port-forwarding tunnels. To use these tunnels, the user must configure their local SSH client to create tunnels to/from the bastion.
You can use this OpenSSH configuration generation form to create a sample SSH configuration for OpenSSH-based clients.
Windows users will need to configure port tunnels in their SSH application of choice.
Web based ParallelWorks Access
See the RDHPCS Cloud Computing for details on using ParallelWorks in a web browser to access on-premise and cloud HPCS.